Repair Procedure
Repair Procedure
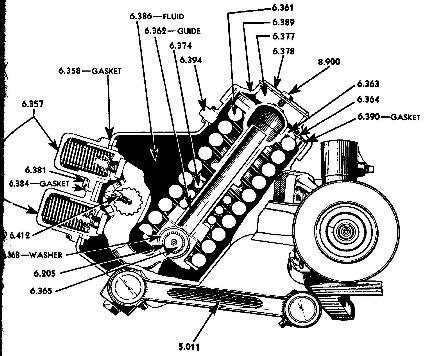
The following is a phantom picture of 37 Knee and below how I've repaired them. (Caution! If you work on your knees using these instructions, I assume that you use basic safety practices and are aware that a "busted knuckle" usually occurs when wrenching. So be careful cuz we don't want to loose a 37 Chev affectionado.)
DO NOT UNSCREW CAP #6.389. If you live thru it, you will need a 25,000-LB arbor press to put it back together. (I've recently heard that this cap can be removed when the arm is at bottom of travel, despite above warnings, but I haven't been brave enough to try it my self.)
The problem starts when shock oil (or 10W) level isn't maintained. The shocks won't work when the oil level is below seal & bushing #6.365. The car bounces down street, unsafely and the bushing wears out. The seal won't hold oil when the shaft #6.205 wobbles. Had DeBonnet design the unit with shocks at the bottom and provisions for sway bar, it would have been a winner.
It might be easier to repair if you removed the front fender. Jack up car (safety stands, level driveway). Remove wheel.
Remove both shocks (6.357) for access to remove set screw (6.412). (There are small springs in each shock causing it to jump at you when you remove the last bolt.) Remove 2 bolts holding strut arm (5.011) to knee housing. Loosen set screw on large brass nut by seal and unscrew nut. Pull spindle, brake drum, and lower strut arm assembly out of unit and hang on wire so as not to stress brake hose. Spring will push interior arm to bottom of case, but don't worry.
Replace bushing (bearings on 34-35) and seal. (If seal is not available, Oil resistant O rings or washers or Graphite string from the Plumbing department of your local Hardware store will slow the leak.) While it's apart, it would be a good idea to clean all the dirty oil (and worn fragments) from inside case.
Using pry bar thru upper shock hole, align interior arm and replace brake drum, etc. (If you removed lower shock to service it, you may use the lower hole to halp with the alignment, if necessary.) Replace set screw, lower arm bolts, and shocks, add oil, and you're ready to parallel trolley tracks without fear or wobble.
Good Luck,
Lou
Ken Herne of Australia has suggested the correct way to repair
Knee Action leaks.
Hi Lou,
Good to hear from you.
I have scratched around my records and found the
part number of the seals that I used for my Knee Units.
The Part Number is TC12564 and were purchased from Consolidated Bearing
Company who have a large number of branches throughout Australia.
To install the seal, take the nut to a machine shop
to have the outside cut away to take the seal and press the seal into the
nut. Make sure that the thread in the nut is all clean and also that
the surface where the seal runs on the shaft is polished and clean as any
damage here will result in a weep from the seal. Put some grease
on lip of the seal and slip the nut and seal onto the main shaft and wind
the nut onto the thread as you install the shaft into the knee housing.
It is a good idea to use some silastic type of thread sealer or goo on
the threads of the nut so that you don't get any oil weeping out
the threads. If you put the nut (with seal installed) onto the housing
first, then install the shaft, it is possible to damage or roll over
the outer lip of the seal and the last thing you want is to have to pull
the rotten thing apart again because it leaks.
Fit the original locking screw to the nut, a bit
of paint and I defy anyone to be able to see the modification - it still
looks original. When adjusting the vehicle height, take the
car for a short drive to settle everything and park the car on level ground.
Measure the distance from the bottom of the king pin boss to the
bottom of the brake backing plate. This measurement should be 5 1/2" for
34 and 35 models and 4 7/8" for 36/37/38 models. A 1/8" tolerance
in allowed either way from the adjusting nut being level with the top of
the spring housing. Shims may be required under the spring (or reset springs)
to get this adjustment correct.
I have had success with my rebuilt knees and put
some thought and a little money into getting them right the first time.
Other
modifications that you may consider are, a drain plug in the bottom
of the housing and a breather in the top. You may ask why a breather
??, well I figure that as the oil gets warm with use it has to build up
pressure inside the housing which would encourage oil leaks - you
can use a differential breather placed well above the filler plug.
Best Regards and Happy Motoring
Ken
Other Options:
If you find a "Donor" Standard straight axle passenger car to
furnish the parts for the switch, the best method is to swap frames.
(i. e. Frame off restoration.). The knee action of the Deluxe
can be unbolted and the spring shackles unriveted from the Standard and
bolted on the Deluxe frame when the exact location is determined.
The only problem is that only the upper half of the front frame member
remains as the lower half was removed with the knees. Since the upper
usually rust out from radiator drips, there may not be any structural cross
members left to hold the car together.
The knees give a soft ride and will parallel trolley
car tracks but there is no way to attach a sway bar and the Shocks are
prone to failure. If you succeed in the above change to straight
axle, your 37 Chev will steer & ride like an old truck.
The straight axle from a 37 - 40 standard is the only "Donor" that will
fit. The 1933 - 54 truck axle has a 2 inch different spring spacing.
The 55 - 59 trux have a different spacing and track. It is true that
the 37 - 38 Taxi/Limousine (127" wheelbase) used a 3/4 ton axle on a passenger
front frame with adapters.
The Limo has 127" WB and Jump seats. They are quite rare
and should probably not be used for Donor vehicles.
Other options are a 39 - 48 Chev passenger
suspension. The weak link being the upper "A" arm is the shock
which is insufficient by today's standards. The 49 - 54 is about
3" too narrow where it bolts to the frame. With some engineering,
the frame can be cut and gussetted to fit. The center steering arm
replaced with a rack and pinion will also take some engineering to turn
correctly. 49- 50 and 51 - 54 Truck brake drums will fit the respective
year passenger axle so your 6 bolt wheels will fit. The
55 - Camero ball joint front end is too wide in the track.
Jim
Carter <jimcartertruckparts@worldnet.att.net> sells a kit that uses
AMC parts to change front axles. Click here.
I've driven a few 1974 Pinto/Mustangs when
new and would not recommend wasting my time to install a suspension that
ran chicken footed when new. They also were not designed to
have as much weight on them. They are used in Hot Rods due to the
fact that there are so many Pintos in junkyards from which to draw parts.
1986 - 90 Japanese 2 wheel drive trucks, except
Toyota, have the same track and 6 bolt lug pattern. I have not tried
this yet. The 4 wheel drive require cutting the center out of your
wheels to fit over the hub.
If the rest of your car is stock, you might as well
fix the knees.
Click to see other repair pages: